
 xiongwanxiong
3435d7ebb6
Merge remote-tracking branch 'origin/master'
xiongwanxiong
3435d7ebb6
Merge remote-tracking branch 'origin/master'
|
3 ヶ月 前 | |
|---|---|---|
| .. | ||
| .vscode | 4 ヶ月 前 | |
| cacp | 4 ヶ月 前 | |
| public | 4 ヶ月 前 | |
| src | 3 ヶ月 前 | |
| .gitignore | 4 ヶ月 前 | |
| .npmrc | 4 ヶ月 前 | |
| .prettierrc.json | 4 ヶ月 前 | |
| Dockerfile | 4 ヶ月 前 | |
| Dockerfile-arm | 4 ヶ月 前 | |
| README.md | 4 ヶ月 前 | |
| env.d.ts | 4 ヶ月 前 | |
| eslint.config.js | 4 ヶ月 前 | |
| index.html | 3 ヶ月 前 | |
| nginx.conf | 4 ヶ月 前 | |
| node_version | 4 ヶ月 前 | |
| package.json | 3 ヶ月 前 | |
| tsconfig.app.json | 4 ヶ月 前 | |
| tsconfig.json | 4 ヶ月 前 | |
| tsconfig.node.json | 4 ヶ月 前 | |
| vite.config.ts | 4 ヶ月 前 | |
README.md
前端开发
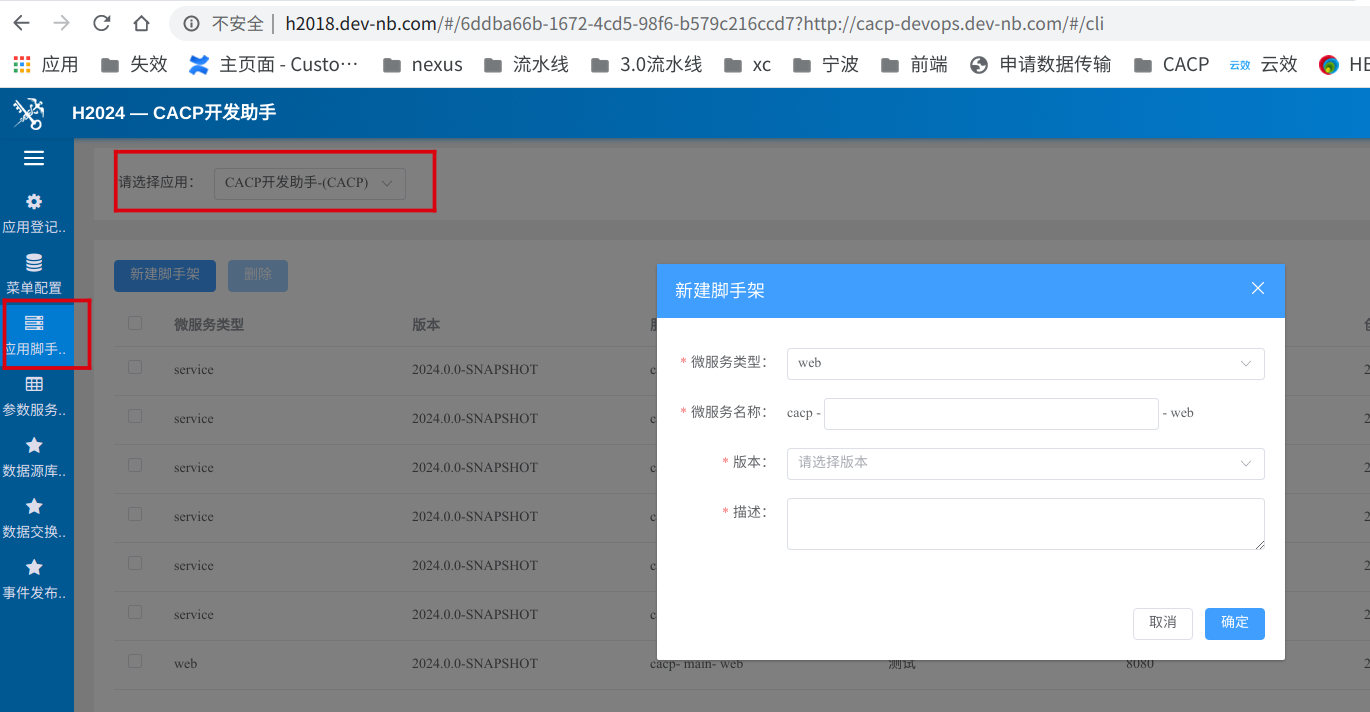
1. 脚手架创建前端项目流程
- 研发网登录前端框架(www.h2018.dev-nb.com, cacpuser/Cacpuser1!@),进入“CACP开发助手”;
- 应用登记(切换菜单到“应用登记注册”);

- 脚手架创建及下载(切换菜单到“应用脚手架”),选择已登记应用,创建前端脚手架(系统缩写-模块缩写-web)并下载;
2. 前端结构说明
|── public                                  // 公共资源
│   ├── config.js                           // 项目部署后根据实际地址修改配置,本地开发无需关注
│   ├── favicon.ico                         // 项目favicon小图标

├── src                                     // 源代码
│   ├── apis                                // 所有 HTTP 请求
│   │   ├── user.ts                         //(根据业务模块命名,和 /views/* 一一对应)
│   │   ├── authority.ts                    // 根据用户获取角色与权限
│   │   ├── frame.ts                        // 获取用户信息
│   ├── assets                              // 图片样式等静态资源
|   ├── components                          // 公共组件
|   ├── directives                          // 通用指令封装
│   │   ├── index.ts                        // directives文件整合入口
│   │   ├── permission.ts                   // 校验页面功能权限方法
|   ├── hooks                               // 公共方法封装
|   ├── plugins                             // 插件配置
│   │   ├── index.ts                        // 插件文件整合入口
│   │   ├── icon.ts                         // cacp/svg-icons图标全局注册
│   ├── router                              // 路由
│   │   ├── app-router.ts                   // 根据项目大小调整,项目模块少可以集中在app-router.ts里面配置,反之(根据业务模块命名,和 /views/* 一一对应)
│   │   ├── index.ts                        // 路由入口
│   ├── stores                              // 全局 store 管理
│   │   ├── index.ts                        // store文件整合入口
│   │   ├── core.ts                         // 获取用户信息
│   │   ├── pinia.ts                        // pinia配置
│   ├── types                               // TS类型定义
│   │   ├── user.ts                         //(根据业务模块命名,和 /views/* 一一对应)
│   ├── utils                               // 全局公用方法
│   │   ├── authhelper.ts                   // 401报错消息发送给门户框架,以及框架处理
│   │   ├── frame.ts                        // 监听门户发送过来的用户信息消息,以及监听cookie消息
│   │   ├── http.ts                         // 调用不同应用接口服务,全url访问
│   │   ├── request.ts                      // 全局 http 请求方法封装,调用相同应用接口服务,相对路径
│   ├── views                               // 页面视图
│   │   ├── user                            // 响应路由切换的 vue 组件(根据业务模块命名,和 /apis/* 一一对应)
│   │   ├── ErrorView                       // 错误页面
│   │   ├── HomeView                        // 首页
│   ├── App.vue                             // 入口vue
│   ├── main.ts                             // vue 入口加载组件初始化等
│   ├── config.ts                           // 自定义配置,本地开发与后台接口联调参数配置
├── vite.config.ts                          // vite配置
├── .gitignore                              // 文件提交忽略配置
├── .prettierrc.json                        // 代码格式化配置
├── nginx.conf                              // ng配置,部署后生效
├── node_version                            // node版本设置,部署后生效
├── Dockerfile                              // 项目部署X86环境Dockerfile配置,部署后生效
├── Dockerfile-arm                          // 项目部署arm环境Dockerfile配置,部署后生效
└── package.json                            // 包配置
└── package-lock.json                       // 包下载地址
3. 脚手架启动
3.1 运行脚手架
- 在根目录执行命令 npm install (只在项目第一次运行时执行项目依赖安装);
- 在根目录下执行 npm run dev;
- 配置本地host映射,如果是windows环境,一般是在C:\Windows\System32\drivers\etc\hosts文件进行配置,如果是arm环境,一般是在\etc\hosts文件进行配置;
- 其配置格式为
127.0.0.1 local.系统缩写-模块缩写.dev-nb.com,映射域名的二级域名需要与前端框架保持一致; - 访问 (www.hy.dev-nb.com, 并登录,新开浏览器页签访问host配置的域名,即可正常通过api网关访问云上环境部署的后台服务;
- 在浏览器打开http://local.系统缩写-模块缩写.dev-nb.com:8080/查看运行的项目;
- 脚手架支持热更新,运行中更新代码后保存,自动操作触发热更新;
3.2 技术栈
- 前端总体技术架构与开发规范基于:Vue3+Vuerouter+Pinia+ElementPlus+Axios+ES6+Node.js;
- 技术架构及开发规范:http://web-dev.rd.domain.com/
- css预处理器建议使用less npm install less less-loader ; 备注:如果旧项目中使用sass,执行npm install sass sass-loader,node-sass已弃用;
4. 代码提交
- 参考代码提交
5. 开发示例
5.1 开发主要涉及到的文件
根据项目实际需求开发修改以下文件:
- API定义
src/apis/* - assets静态文件
src/assets/* - 公共组件文件封装
src/components/* - 通用指令封装directives
src/directives/* - 公共方法封装hooks
src/hooks/* - cacp/svg-icons图标全局注册plugins
src/plugins/* - 路由及路由组件
src/router/* - stores文件
src/stores/* - 类型定义types
src/types/* - 网路请求整合
src/utils/* - VUE文件
src/views/* - 左侧菜单配置
src/App.vue - 请求后台服务地址
config.ts
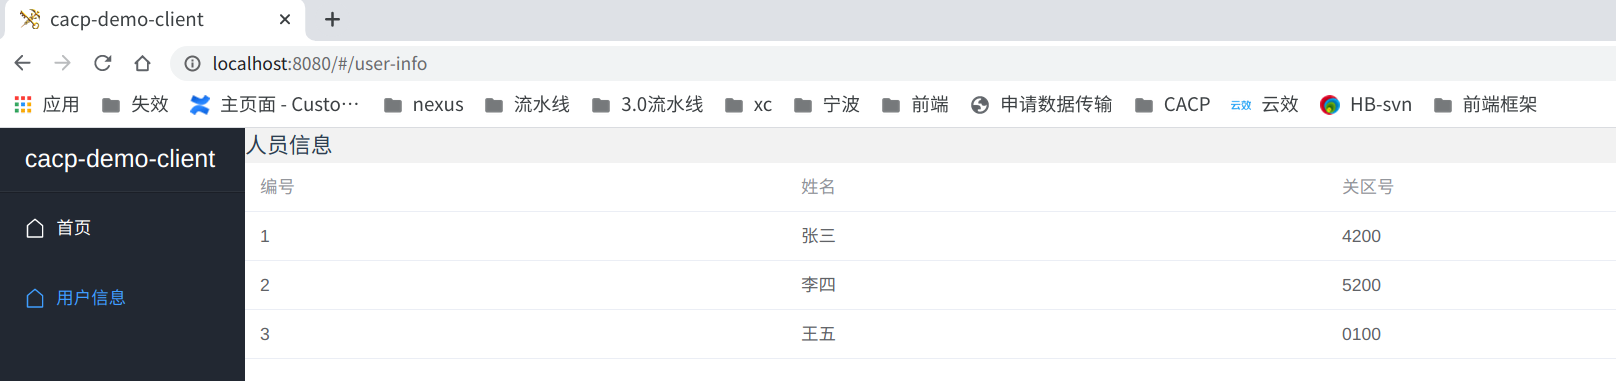
5.2 添加功能页面
根据业务需求在
/src/views文件夹下创建新的业务文件夹,根据业务模块添加user文件夹,相关功能页面全部写在该文件夹下,目录的层级不要太深,添加src/views/user/UserInfoView.vue<template> <div> <h3>人员信息</h3> <el-table :data="personArr"> <el-table-column label="编号" prop="id"> </el-table-column> <el-table-column label="姓名" prop="name"> </el-table-column> <el-table-column label="关区号" prop="customsCode"> </el-table-column> </el-table> </div> </template> <script setup lang="ts"> import { reactive } from 'vue' import type { User } from '@/types/user' const personArr = reactive<Array<User>>([ { id: '1', name: '张三', customsCode: '4200', }, { id: '2', name: '李四', customsCode: '5200', }, { id: '3', name: '王五', customsCode: '0100', }, ]) </script> <style scoped lang="less"> </style>增加路由模块
src/router/app-router.tsimport type { RouteRecordRaw } from 'vue-router' const routers: Array<RouteRecordRaw> = [ { path: '/user-info', name: 'userInfo', component: () => import('@/views/user/UserInfoView.vue'), meta: { title: '用户信息', anonymous: true, keepAlive: true } }, ] export default routers添加新页面路由到
src/router/index.ts中。路由路径要有描述性和包含关键词,路由长度越短越好,不要有太多参数。
路由的路径要全小写字母,连词符要用中划线(
-), 不要使用下划线(_)。import { createRouter, createWebHashHistory, RouterView } from 'vue-router' import appRouter from './app-router' const router = createRouter({ history: createWebHashHistory(), routes: [ { path: '/', component: RouterView, children: [ { path: '/', redirect: '/home' }, { path: 'home', name: 'home', component: () => import('@/views/HomeView.vue'), meta: { title: '首页', anonymous: true, keepAlive: true } }, ...appRouter ] } ] }) // ...向侧边栏目录添加新页面目录信息
src/App.vue,侧边栏导航只在开发环境展示;// ... <router-link to="/user-info"> <el-menu-item index="UserInfo"> <el-icon><House /></el-icon> <span>用户信息</span> </el-menu-item> </router-link> // ...用户模块效果,用户列表页面
5.3 添加接口调用
- 根据业务功能在
/src/apis下创建同views中一样的同名文件/src/apis/user.ts 脚手架中封装了请求工具
request(/src/utils/request.ts)和http(/src/utils/http.ts),采用axios的请求,增加了请求拦截和响应拦截,如果需要在请求前增加统一参数,或者响应时对数据统一处理可在此修改; 备注:request.ts调用相同应用接口服务,使用相对路径,http.ts调用不同应用接口服务,全url访问,使用绝对路径,使用场景前端与后端不是同一个服务;import type { AxiosResponse } from 'axios' import request from '@/utils/request' import type { Result } from '@cacp/ui' import type { Custom } from '@/types/user' const contextPath = '/后端服务名' // 关区翻译 export async function queryCustom(query: Array<String>): Promise<Result<Array<Custom>>> { const res: AxiosResponse<Result<Array<Custom>>> = await request.post(`${contextPath}/customs/query-customs`, query) return res.data }在业务页面添加api请求数据
/src/views/user/UserInfoView.vue<template> <div> <h3>人员信息</h3> <el-table :data="personArr"> <el-table-column label="编号" prop="id"> </el-table-column> <el-table-column label="姓名" prop="name"> </el-table-column> <el-table-column label="关区号" prop="customsCode"> </el-table-column> <el-table-column label="关区" prop="customsName"> </el-table-column> </el-table> </div> </template> <script setup lang="ts"> import { reactive } from 'vue' import type { User, Custom } from '@/types/user' import type { Result } from '@cacp/ui' import * as userInfoApis from '@/apis/user' const personArr = reactive<Array<User>>([ { id: '1', name: '张三', customsCode: '4200', }, { id: '2', name: '李四', customsCode: '5200', }, { id: '3', name: '王五', customsCode: '0100', }, ]) queryCustomInfo() async function queryCustomInfo(): Promise<void> { const customCodes: Array<string> = [] for (const preson of personArr) { customCodes.push(preson.customsCode) } const res: Result<Array<Custom>> = await userInfoApis.queryCustom(customCodes) if (res.code === SuccessResultCode) { for (const preson of personArr) { for (const custom of res.data) { if (preson.customsCode === custom.code) { preson.customsName = custom.name } } } } } </script> <style scoped lang="less"> </style>
5.4 本地开发代理配置
- 脚手架本地开发代理配置(src/config.ts),通过本地代理配置,即可与后端服务(本地/云上部署后)进行接口调试;
- 前端云上环境代理采用根目录下的
nginx.conf进行配置,保持默认即可,配置代理到 API网关 上;
5.4.1 本地前端与本地后端交互
配置代理与本地后端交互(src/config.ts),备注:最新后端脚手架已解决跨域,可以直接在/src/config.ts中配置后台服务地址;
// ...

import type { CacpConfig } from '@cacp/ui'
// 本地开发后台接口地址配置,线上忽略此配置,线上部署配置参考public/config.js文件
const devConfig: CacpConfig = {
SERVICE_ID: '{{service_id}}', //应用服务Id,同CACPAppCode
SERVICE_NAME: '{{service_name}}', //应用服务名
SERVICE_API: 'http://10.200.73.47:18001', // 本地开发应用服务后端ip地址,根据实际开发修改地址
SERVICE_PAGESIZE: 20, // 本应用表格分页缺省大小
SERVICE_TIMEOUT: 300000, //后端API超时请求超时时间
FRAME_API: '/api/cacp-frame-service', //统一入口后端服务地址;
CACP_DEMO_API: '/api/cacp-demo-service', // 为了展示user样例页面使用,不用样例页面时可以删除
NEED_USER_AUTHORITY: true, //前端路由和控件是否需要鉴权
AUTH_MODE: 'Cookie', // 认证方式,JWT或者Cookie
CUSTOMS_CODE: '0000', // 所属海关代码
PROFILE: 'DEV' // 运行环境 DEV、PROD
}
const $config = (window as any).$config as CacpConfig
const { DEV } = import.meta.env
export default DEV ? devConfig : $config

// ...
配置代理与本地后端交互(vite.config.ts),备注:涉及跨域使用此方法
// ...
server: {
port: 8080,
// 是否自动在浏览器打开
open: true,
proxy: {
// 将'localhost:3000/api/服务名/接口名'代理到'http://10.200.**.**:24001/接口名'
'/api/后端服务名': {
  target: 'http://10.200.**.**:24001/', // 对应本地后台服务的ip+端口
  changeOrigin: true, // 如果接口跨域,需要进行这个参数配置
  rewrite: (path) => path.replace('/api/后端服务名', '') // 来重写地址,将前缀 '/api' 转为 '/'。
}
}
}
// ...
5.5 交互结果
- 如若首次访问本地页面报接口错误,属于正常现象,请根据实际开发配置/src/config.ts文件中的参数;

6. 调试
代码中使用console.log('res', res)
// ...
queryCustomInfo()

async function queryCustomInfo(): Promise<void> {
const customCodes: Array<string> = []

for (const preson of personArr) {
customCodes.push(preson.customsCode)
}

const res: Result<Array<Custom>> = await userInfoApis.queryCustom(customCodes)
console.log('res', res)
if (res.code === SuccessResultCode) {
for (const preson of personArr) {
  for (const custom of res.data) {
    if (preson.customsCode === custom.code) {
      preson.customsName = custom.name
    }
  }
}
}
}
// ...
代码中使用debugger (不推荐),多人协同开发时,误提交debugger影响他人开发;